Coding the App
Now its time for some hands on approach to our application. We will start simple with labels, buttons and edit boxes using HTML's handy tools. First we need to enter the www folder in our Apache Cordova app.
Next we open the index.html file using our favorite text editor.
Next we open the index.html file using our favorite text editor.

What we need to understand when working with PhoneGap/Apache Cordova is that its no different from building a web site (and indeed the created page can be also uploaded to the web so we can get a website and mobile app at the same time!).
We recome the <div class="app"> code and replace it with our own. In this case I'll add a title bar and several buttons along with an image box to add chat functionality to the project I'm building (See Chamber Project for more).
We recome the <div class="app"> code and replace it with our own. In this case I'll add a title bar and several buttons along with an image box to add chat functionality to the project I'm building (See Chamber Project for more).
We want to add a title label so we can make use of the <h1> instruction which is used to create headers.
<h1> HEADER TEXT </h1>
We want to be able to easily edit titles so we'll group them into a single class called TitleLabel. That way all the titles in our app can be modified simultaneously by editing the values of the CSS file. To add a class we use the class identifier in HTML.
<h1 class="TitleLabel"> APPLICATION TITLE </h1>
Next I want to add an avatar to the app, for that I'm going to use the <image> tag and since I plan to make it unique to the application and posses its own attributes, I'm going to assign it an ID.
<img src="img/ImageName.jpg" id="Avatar">
Unlike the header tag this one doesn't need a closing tag which ensures our code isn't as verbose. Our code will be shown as follows:
| index.html |
Next we proceed to modify the CSS code so that we can align our title and avatar image on the center of our application. Using our text editor we modify the index.css file located inside the css folder in our app.
To set styles for id objects we make use of the '#' character. We set a max width it can extend and turn it into a block with auto margins so that the image gets located on the middle.
#AppAvatar {
max-width: 200px;
max-height: 200px;
display: block;
margin: auto;
}
To modify classes (for when we want an attribute to affect many objects) we make use of the '.' (dot) character. All objects that share the same class will be affected by our changes.
.TitleLabel {
text-align: center;
}
| index.css |
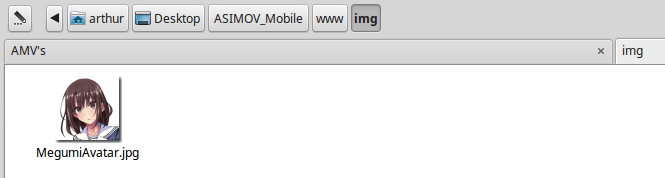
Finally select any image you want as the application's avatar and place it inside the img folder on our app.
We build and run our application:
$ cordova run
And we should be able to see it with the image and text we selected.
We build and run our application:
$ cordova run
And we should be able to see it with the image and text we selected.
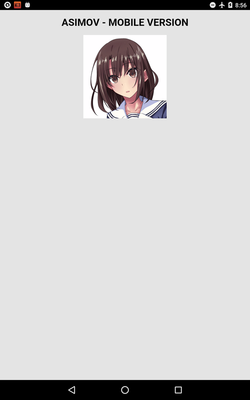
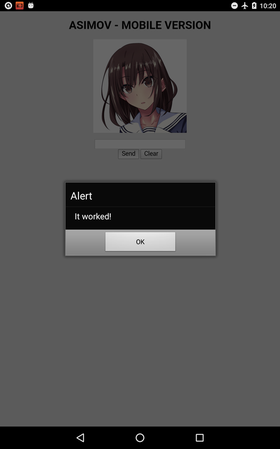
It should show something like this. Still, its fancy but doesn't have any functionality which isn't nearly enough for what we want an app to do. We are going to add a text field and some buttons to liven up our app.
First I'll start with the text field, making it a pseudo chat app. I want it to be able to output commands like it was a Terminal or Shell in our Desktop.
For this we'll make use of a form element. This element will make use of a text field, a submit button and a reset button.
<form class="MiddleElement" method="GET">
<input type="text" id="ChatBox"><br>
<input type="button" id="SubmitChat" class="SubmitButton" value="Send">
<input type="reset" id="ClearChat" class="SubmitButton" value="Clear">
</form>
We now must add functionality to our buttons. In this case we open the index.js file located in the js folder and add the following:
function GetBotReply(){
window.alert("It worked!");
console.log("It worked!");
}
//We make sure the entire application has loaded before adding our Event Listeners.
window.onload = function(){
document.getElementById('SubmitChat').addEventListener('click', GetBotReply);
};
The window.onload method makes sure the entire application is loaded and ready before adding the event handlers. This is necessary because if the app for some reason doesn't load the elements and tries to implement the handlers, it won't be able to find to which objects they belong to and will do nothing or crash in the worst case scenario.
In this case we add a function to our submit button that will generate an alert on the screen and on console when clicked.
In this case we add a function to our submit button that will generate an alert on the screen and on console when clicked.