II.II.-CNC Milling.
Milling involves working with a milling machine which is a device developed to cut and drill pieces on an X-Y-Z plane, in this case controlled by G code. As you've seen in previous chapters, G code is a bunch of instructions and coordinates that tell the machine where to move the leadscrew in order to cut a path and give shape to the piece. Due to the high costs of CNC machine's, where gonna instruct how to practice using a simulator which is an application that simulates the conditions and interprets the instructions used in a CNC program. The name of this application is CNC Simulator which sadly only runs on Windows. Have sought the net but have seen a notable lack in CNC simulators for the Linux platform, such a shame really.
So first thing is to download and install the CNC Simulator classic which is a free non-Internet version. You can download it from my CODE Repository section. Follow the instructions to install it.
So first thing is to download and install the CNC Simulator classic which is a free non-Internet version. You can download it from my CODE Repository section. Follow the instructions to install it.
|
After starting CNC Simulator classic, you will see the following interface. It may look ugly but as Zen says, simplicity is usually the best (and also it doesn't overload my computer's memory).
Now, the program gives you three (3) views of the piece, upside, parametric to the right and to the left in sketch mode. The tool will be moving across the screen marking the desired changes according to the instructions given and will warn about mistakes if they appear. The middle bottom half of the interface shows the coordinates in which the tool is moving, if the cooling is flowing, the depth of the drilling/milling in colors (the deeper you are, the colors in the piece vary) and has a button for starting/stopping the simulation. |
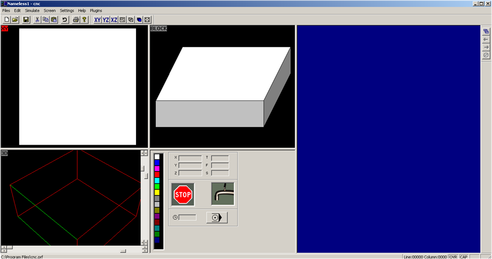
The interface.
|
Now the first thing you must do is to configure the block you're gonna mill and add the dimensions, for that you must make click on the Simulate menu on the menu bar and then on Detail Settings.
Simulate -> Detail Settings
Simulate -> Detail Settings
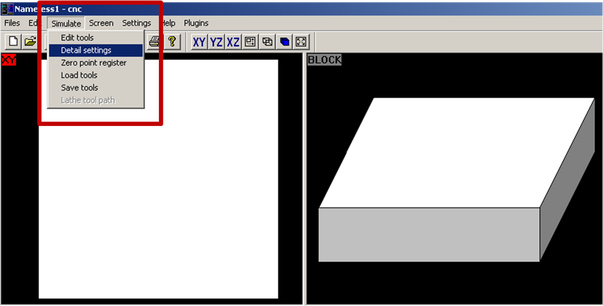
On Detail Settings you will be able to edit the Geometric information of the piece.
|
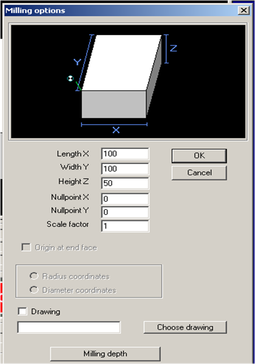
Which will bring the Detail Settings dialog box. Here you can edit the X, Y & Z dimensions of the block along with adding scale factors to the drawing and introducing other drawings in the program (something I've never made before...).
Now for this first exercise we're gonna edit X,Y & Z with the following dimensions: Length X: 80 Width Y: 100 Height Z: 50 And we leave the rest as they are. This will modify the piece you see on the main window. Now let's do some G code! |
|
