RXTX - Java Serial Communications Library.

Serial communication schematic using a microcontroller to interact with the computer. RS-232 protocol.
In order to get interaction between the contained world that is our application and the outside world that we want to control, for example in order for our application to control the movement and position of a motor, or in our case the turning on/off of a valve whenever there are leaks in the system.
From design, Java lacks support for this kind of interaction as the language was originally planned to work in a contained environment (the Java virtual machine) and have no contact with the outside world. Luckily, design limitations have never been a problem for programmers and several libraries that grant communication between the application running in the JVM (Java Virtual Machine) and the outside world have been developed.
Here, we'll deal with the RxTx library.
Serial Communication.
Serial communication is a peer-to-peer communication protocol, and one of the simplest and more widespread in actuality given the low costs of this type of communication and the ease of use. It makes use of the RS-232 protocol, which we won't deal with in this article, instead focusing on the programatically aspect of it, although for those looking for more information on this protocol, it can be seen in the Periphereal Programming course or the Industrial Networks one in the Mechatronics section.
The serial port consists of sending 0's and 1's through a copper wire from an emitter and interpreting them in a receiver. In our case the emitter can be either the computer or the microcontroller.
The serial port consists of sending 0's and 1's through a copper wire from an emitter and interpreting them in a receiver. In our case the emitter can be either the computer or the microcontroller.
Installing the RxTx library.
1.-First of all, download the RxTx library from the official page, according to your Operative System.
http://rxtx.qbang.org/wiki/index.php/Download
In our case I downloaded the rxtx 2.1-7r2 (stable) file from the webpage and located it in a special directory I use for my libraries and applications called "My Applications".
http://rxtx.qbang.org/wiki/index.php/Download
In our case I downloaded the rxtx 2.1-7r2 (stable) file from the webpage and located it in a special directory I use for my libraries and applications called "My Applications".
2.-After that, we decompress the file and put it in a folder we don't plan to move. In my case, its in Desktop -> Files -> My Applications.
3.-We must move the serial files to the folder where our main Java files are located in the system. We must access the RxTx folder and copy-paste the files as follows:
c:\Program Files\Java\jdk1.6.0_01\
4.-Once that is finished, we must include the libraries in our NetBeans IDE. To do that, we go to Tools -> Ant Variables and add a New Library.
5.-The new library must be given a name, in our case we call it RxTx and leave it as a Java Class. We press OK.
6.-Afterwards, we press the Add JAR/Folder button and go to the location where we placed our RxTx folder, and select the RxTx-commons file. Press OK.
7.-Finally we add the library to the project by making right click in the libraries menu on the Project menu at the top left of the NetBeans application. We select the Add Library and we'll get a menu enumerating all libraries available in the system. We select the RxTx previously defined and make click in OK.
3.-We must move the serial files to the folder where our main Java files are located in the system. We must access the RxTx folder and copy-paste the files as follows:
c:\Program Files\Java\jdk1.6.0_01\
- Copy rxtxParallel.dll to c:\Program Files\Java\jdk1.6.0_01\jre\bin\
- Copy rxtxSerial.dll to c:\Program Files\Java\jdk1.6.0_01\jre\bin\
- Copy RXTXcomm.jar to c:\Program Files\Java\jdk1.6.0_01\jre\lib\ext\
4.-Once that is finished, we must include the libraries in our NetBeans IDE. To do that, we go to Tools -> Ant Variables and add a New Library.
5.-The new library must be given a name, in our case we call it RxTx and leave it as a Java Class. We press OK.
6.-Afterwards, we press the Add JAR/Folder button and go to the location where we placed our RxTx folder, and select the RxTx-commons file. Press OK.
7.-Finally we add the library to the project by making right click in the libraries menu on the Project menu at the top left of the NetBeans application. We select the Add Library and we'll get a menu enumerating all libraries available in the system. We select the RxTx previously defined and make click in OK.
8.-Now to test the library we'll make use of an Arduino which is the preferred microcontroller platform to test prototypes. The Arduino has many special and powerful characteristics, but in this case, we will be using the serial port it directly provides to the computer along with the integrated led to test our application. To do so, load the following code in the Arduino:
ARDUINO CODE:
const int LED = 13; //LED connected to digital pin 13
int inByte = 0;
void setup(){
Serial.begin(9600); //Open the serial port
pinMode(LED, OUTPUT); //Set the digital pin as output
}
void loop(){
if(Serial.available() > 0){
inByte = Serial.read(); //read the incoming byte
if(inByte == '1')
digitalWrite(LED, HIGH); //turn the LED on
else
digitalWrite(LED, LOW); //turn the LED off
}
}
JAVA CODE:
import java.awt.event.ActionEvent;
import java.awt.event.ActionListener;
import java.io.IOException;
import java.io.OutputStream;
import java.util.Enumeration;
import gnu.io.CommPortIdentifier;
import gnu.io.SerialPort;
import javax.swing.JButton;
import javax.swing.JFrame;
import javax.swing.JLabel;
import javax.swing.JOptionPane;
import javax.swing.JPanel;
public class JPanelTurnOnOffLED extends JPanel
implements ActionListener {
private static final String ON = "On";
private static final String OFF = "Off";
private static final String TURN_ON = "1";
private static final String TURN_OFF = "0";
private JButton switchOnButton;
private JButton switchOffButton;
private JLabel label;
private JFrame frame;
/** The output stream to the port */
private OutputStream output = null;
SerialPort serialPort;
private final String PORT_NAME = "/dev/cu.usbmodem1d11";
/** Milliseconds to block while waiting for port open */
private static final int TIME_OUT = 2000;
/** Default bits per second for COM port. */
private static final int DATA_RATE = 9600;
public JPanelTurnOnOffLED(){
switchOnButton = new JButton(ON);
switchOffButton = new JButton(OFF);
switchOffButton.setEnabled(false);
label = new JLabel("Turn On/Off LED:");
switchOnButton.addActionListener(this);
switchOffButton.addActionListener(this);
add(label);
add(switchOnButton);
add(switchOffButton);
initializeArduinoConnection();
}
public void initializeArduinoConnection(){
CommPortIdentifier portId = null;
Enumeration portEnum = CommPortIdentifier.
getPortIdentifiers();
// iterate through, looking for the port
while (portEnum.hasMoreElements()) {
CommPortIdentifier currPortId = (CommPortIdentifier)
portEnum.nextElement();
if (PORT_NAME.equals(currPortId.getName())) {
portId = currPortId;
break;
}
}
if (portId == null) {
showError("Could not find COM port.");
System.exit(ERROR);
return;
}
try {
// open serial port, and use class name for the appName.
serialPort = (SerialPort) portId.open(this.getClass()
.getName(), TIME_OUT);
// set port parameters
serialPort.setSerialPortParams(DATA_RATE,
SerialPort.DATABITS_8,
SerialPort.STOPBITS_1,
SerialPort.PARITY_NONE);
// open the streams
output = serialPort.getOutputStream();
} catch (Exception e) {
showError(e.getMessage());
System.exit(ERROR);
}
}
public static void createAndShowGUI(){
JFrame frame = new JFrame("Turn On/Off LED example");
frame.setDefaultCloseOperation(JFrame.EXIT_ON_CLOSE);
//Create and set up the content pane.
JPanelTurnOnOffLED newContentPane = new JPanelTurnOnOffLED();
newContentPane.setOpaque(true); //content panes must be opaque
frame.setContentPane(newContentPane);
//Display the window.
frame.pack();
frame.setVisible(true);
}
public static void main(String args[]){
javax.swing.SwingUtilities.invokeLater(new Runnable() {
public void run() {
createAndShowGUI();
}
});
}
@Override
public void actionPerformed(ActionEvent e) {
if(ON.equals(e.getActionCommand())){
switchOnButton.setEnabled(false);
switchOffButton.setEnabled(true);
sendData(TURN_ON);
}else{
switchOnButton.setEnabled(true);
switchOffButton.setEnabled(false);
sendData(TURN_OFF);
}
}
private void sendData(String data){
try {
output.write(data.getBytes());
} catch (IOException e) {
showError("Error sending data");
System.exit(ERROR);
}
}
private void showError(String errorMessage){
JOptionPane.showMessageDialog(frame,
errorMessage,
"Error",
JOptionPane.ERROR_MESSAGE);
}
}
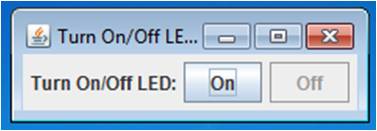
If everything has worked well, you'll get the following menu which when pressed should turn on and off the LED contained in the Arduino.
SOURCES:
http://josedeveloper.com/2012/01/28/comunicacion-serial-java-y-arduino/
http://mdsaputra.wordpress.com/2012/01/24/java-com-programming-with-rxtx-in-windows-based-os/
http://josedeveloper.com/2012/01/28/comunicacion-serial-java-y-arduino/
http://mdsaputra.wordpress.com/2012/01/24/java-com-programming-with-rxtx-in-windows-based-os/
