II.II.I.-My first example.
Now here's where the fun begins! I'm gonna show you step by step what each G code instruction means and simulate your first piece. Let's get started!
|
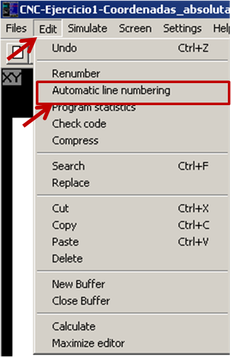
Now after you have configured the block's dimensions, you must activate another extremely useful function called autonumbering. Most old CNC Milling machines require you to write the number for each block of code you want to create (N0 ...Block of code 0...., N10 ...Block of code 1...., note that usually one writes the blocks with an increment of 10 so that if by chance a mistake happens, you can write the block N1 or N3, or N27 instead of rewriting all the N's in the application), but the newer models automatically make the numbering for ya so you don't need to write it anymore!
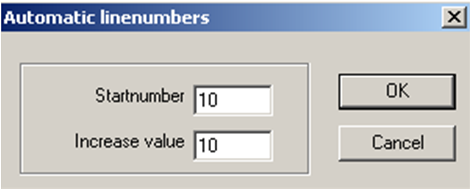
For that we must clock on Edit and then another on Automatic Line Numbering. Edit -> Automatic Line Numbering This will activate the automatic line numbering on the CNCSimulator, freeing you from that tiring task. It will show you a dialog box asking in what number start the numbering process and the incremental value (by how many will the numbering increase). Leave it as it is for now, we're not gonna need anything more complicated and make click on OK. Getting hand on on the G code.Now for the promised G code. First thing one must do when making a CNC application is to indicate the program that we're starting. In old models you had to type the signs "$, #, o" among others which varied from model to model to indicate you will start to write G code. Its no longer necessary though...
|
|
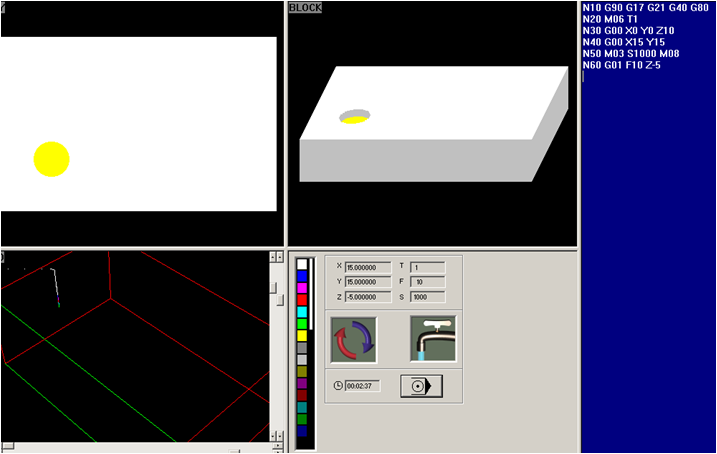
Now we go to the big blue box on the right of the screen and indicate the machine if we're gonna work on absolute or incremental coordinates. Absolute coordinates is when you establish a single point on the coordinates system and start measuring from that initial point to the rest of the coordinates system whereas incremental coordinate systems use the last point where your tool landed as the new starting point and measure from there. I may make a whole chapter on it on request but for now lets work with absolute. We indicate absolute by typing G90 on the screen. Also we indicate in which plane are we working, on this case we're moving on the X-Y plane as we have no need to work up-down the piece, so we type G17.
After that, we indicate if we're gonna measure on millimeters or inches, we type G21 to indicate we wish to work on millimeters.
Then we type G40 and G80 which are cancel cutting compensation and cancel cicle to remove any instructions that were preloaded on the machine Note that this must be done in ALL programs to prevent accidents or damage to the tools or worse, the machine. After that the block must look like the following:
N10 G90 G17 G21 G40 G80
Then we must select which tool we want to use, in this case we're gonna work with the tool located in the 1rst place on the rack. It has a length of 30mm and a diameter of 10mm. You can see its dimensions (and edit it but I don't recommend it) by clicking Simulate -> Edit Tools. We type M06 T1 to order the machine to take the first tool we have on the rack 1 (hence T1).
N20 M06 T1
Once we are done, we move ourselves to our center of origin to start working, which as we're working on absolute coordinates must be X0 Y0 and Z0...well, not quite, if we move to Z0 the machine will move to the position where the leadscrew gets in contact with the piece, the problem is that it will do so with such force that it may damage the motor. So the coordinates will be entered as X0 Y0 Z1 to give it some space between the leadscrew and the block. The instruction to move the leadscrew fast is G00. It must look like this:
N30 G00 X0 Y0 Z1
Now we'll move to the coordinates X15 Y15 using the same command as before, G00. Its very useful when we want to move from one stop to another as it forces the machine to move at max speed to that point but as such must NEVER be used when milling as the strain will prove to much for the leadscrew or the machine. Rather we must give it time to cut away at the piece no matter how slow it may seem to us.
N40 X15 Y15
You can see that we haven't typed the G00 on the following block. That is because the machine remembers the configured instruction we used earlier and won't change them until we have used another one to replace it, as in G00 can be replaced with G01, G02 or G03 for example, and as such it becomes redundant and a waste of machine code to type it again. Nonetheless for those beginning on G code, its recommended to type it nonetheless to prevent accidents.
Now that we're over the desired milling spot, we activate the leadscrew to spin and cut away, for that we use the M03 instruction which asks for the rotational speed SXXXX (it varies according to material, for this example we will set the speed to 1,000) and activate the cooling which is a substance that is sprayed to the piece (sometimes even flooded) in order to prevent overheating which will deform the piece and damage the equipment. Sometimes you can mill without it but its harmful for everyone in the long term. We activate the cooling with M08.
N50 M03 S1000 M08
Now we cut into the piece using the G01 instruction which stands for linear cutting. It will ask for the forward speed (how fast will it move across the block, again it changes from leadscrew to leadscrew and block to block but is in minutes/revolution so it tends to be pretty slow...). We will set the forward speed to 10 and order the machine to mill 5 millimeters into the piece (that's into the Z axis). The instruction will look like this:
N60 G01 F10 Z-5
The negative value is because the Z positive is upside whereas the -Z axis is downside (into the block). After that is done the machine will start milling and will leave a yellow print on the block like the following picture:
After clicking the simulate button it shows something like this...
And where's the ef'''in simulate button?
If you haven't found the simulate button, I'll mark it on a red block for ya!
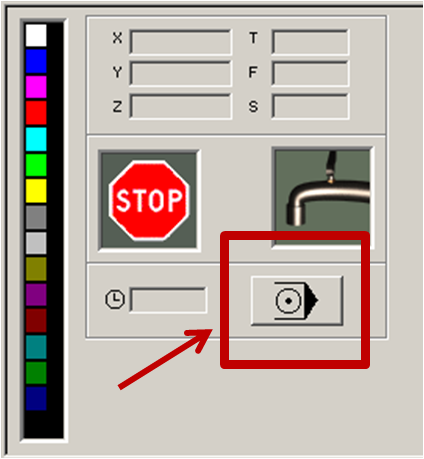
Say hello Simulate Button!
Button: Hello!
|
Simulate 101: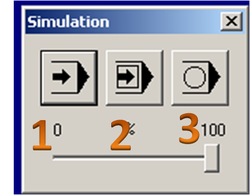 One two three four...GO!
Once you click on it, it gives you three more buttons. The first one to the left makes a continuous simulation of each step from start to the end of the program showing each step of the instructions and stopping if there is an error [1], the second one lets you go step by step across the simulation to analyze the code [2] and the last one (which I never use) stops the simulation [3].
P.D. You get a cookie if you understand the caption's reference, LOL! |
